

Android platform is the most commonly used platform now a days. Because of the freedom of installing third party apps and its user friendly customization people prefer android devices over other devices.
How To Generate Unlimited Barcode For Reliance Jio

Reliance Jio is already in the market and many people have already configured their mobile for Reliance Jio. It's not that hard as it just need installing of Jio app from store.
But, some people are facing problem regarding barcode. If you don't know about Jio barcode then let me tell you that Reliance Jio needs a 4G enabled phone and one must install Reliance Jio app in that phone which will give you a barcode. That barcode is the only way you can purchase a Reliance Jio sim.
If you're also facing a "Barcode Redeemed" problem then use this trick to generate another barcode.
Note: Changing IMEI is illegal. Try this trick at your own risk. We will not be responsible for any loss or damage.
Steps to follow
- Download "IMEI Changer" app from Play Store. (There are too many apps in Play Store. Choose any.)
- Give it Root (SuperSu) permission.
- Now change your IMEI to 35742207091XXXX (Change XXXX to any 4 digit).
- Save the setting and reboot your phone.
- Now open "My Jio" app and you'll see "Get Jio Sim" option.
- Repeat this process to get unlimited barcode for Jio sim card.
Spread the word!
Spyware v5.5

Spyware, adware, browser hijackers, and dialers are some of the fastest-growing threats on the Internet today. By simply browsing to a web page, you could find your computer to be the brand-new host of one of these unwanted fiends!
The most important step you can take is to secure your system. And SpywareBlaster is the most powerful protection program available.
Features
- Prevent the installation of ActiveX-based spyware, adware, browser hijackers, dialers, and other potentially unwanted software.
- Block spyware/tracking cookies in Internet Explorer and Mozilla/Firefox.
- Restrict the actions of potentially unwanted sites in Internet Explorer.
SpywareBlaster can help keep your system spyware-free and secure, without interfering with the "good side" of the web. And unlike other programs, SpywareBlaster does not have to remain running in the background.
How To Increase Reliance Jio Speed
Reliance Jio is getting famous day by day as it is offering free 4G internet, free calls and free SMS. This is why everyone is running behind Reliance Jio. Recently we heard an agreement between Reliance Jio and Airtel as Reliance Jio was facing call drops a lot.
Coming to the point, when Reliance Jio rolled out it was offering people a great internet speed ranging from 10-20 MBPS. Some people even downloaded GBs of data in one day of launch.
But nowadays Reliance Jio is not working same and its speed has reduced due to heavy load on servers. That's why we have come with another solution on how to increase Reliance Jio internet speed.
NOTE: If you are noob/beginner, Try it on your own risk! We will not be responsible for any damage.
Changing APN
- Go to settings
- Choose Mobile networks option
- Set Preferred network type to LTE & press back button
- Select Access Point Names (APN)
- Scroll down until you see ‘APN protocol’ option > make it IPv4/IPv6
- Again scroll & select ‘Bearer’ option & choose ‘LTE’.
- Now save all the settings (Important)
- Turn on your data connection & check speed.
For Rooted Phones
- Download 3G/4G Speed Optimizer apk on your phone (Google it for download link).
- In Select network speed, choose : 12/28/7 – Max Speed (Low battery efficiency) option.
- Click on ‘Apply Tweak’.
- Restart phone & after that (hopefully) you will see increase in speed.
Using VPN (No root required)
- Download ‘Snap VPN‘ from play store. It’s available free of cost.
- After opening, you will see the list of countries. In front on each, signal strength is given.
- Select the country which has good strength & tap on connect (poor strength = less speed)
- It might not connect in first attempt, keep trying.
- Once the connection is established, try downloading some files to check downloading speed.
Using Speedify
- They have both version (for android & desktop version)
- If you are gonna use Wifi, then use desktop version else download their android app if you want to increase speed in mobile.
- It’s kind of VPN only.
- Simply connect to nearest server & enjoy high speed 4G in your Reliance Jio sim.
Changing Band
- Download MTK engineering mode from play store. If you know USSD code to enter into engineering mode, then there’s no need to download app.
- Change band to 40 (2300 MHz)
- Set FDD-LTE to 1800/850 MHz
- Further you can also use Speedify to get even more speed (Optional)
- Save everything & get ready to fly with blazing 4G speed!
Increase Jio Speed In Lyf Flame 6 Smartphone
(Might Work In Other Phones Too)
- Download AnyCut app from play store.
- Create shortcuts for ‘Phone Info’ and ‘Engineering Mode’ from app.
- Open ‘Phone info’ shortcut and set ‘Preferred Network Type’ to TD-LTE Singlemode.
- Check your net speed again, if it’s not improving then follow next steps.
- Open ‘engineering mode’ and click on ‘Band Select’.
- Uncheck FDD_Band5 & click on SET button. If 2300 MHz band is available in your area, then just go for it.
- Reboot phone & see the rise in jio net speed.

USB Fix

UsbFix is a free malware removal tool that helps you to detect and remove infected USB memory sticks or any other USB removable devices, such as external HDD's, smartphones, digital cameras or other peripherals that connects to your computer or laptop via the USB port.
Features
- Support offered directly from the software interface. You are able to post your issues on UsbFix's forum.
- UsbFix can detect and remove infections found on your removable devices.
- UsbFix repairs the damaged files to your PC, such as: registry, hidden files, task manager etc.
- Back-up support: UsbFix will backup your files and folders.
- Vaccination option: UsbFix prevents future infections by creating new autorun.inf files on removable drives.
The current version runs on almost all versions of Microsoft Windows such as XP, Vista, 7 and 8.
Adw Cleaner

AdwCleaner is an application that searches for and deletes Adware, Toolbars, Potentially Unwanted Programs (PUP) and browser Hijackers from your computer. By using AdwCleaner you will be able to remove numerous types of unwanted programs. This in turn will give you a more streamlined PC and a better user experience whilst browsing the web.
Features Include
- AdwCleaner can remove unwanted Toolbars and Page Hijackers.
- The application is designed to search and delete all unwanted, often bundled, applications that sometimes come attached to freeware applications.
AdwCleaner is compatible with Windows XP, Vista, 7, 8, 8.1 in both 32 & 64 bit systems.
Malwarebytes

Malwarebytes Anti-Exploit protects you against the security vulnerabilities in the code, which make up your software programs. Your software contains millions of lines of code, which unfortunately some people want to exploit.
Malwarebytes Anti-Exploit protects you from these vulnerabilities which people can manipulate in order to infect your system with malware. The software gives you three layers of security protection around popular browsers and applications, thereby preventing the vulnerable code from being exploited.
The software is not an antivirus product in itself, but it is compatible with most antivirus software.
Features
- It protects browsers and their add-ons
- Protects browser components
- Protects media players and PDF readers
- Allows you to manage custom shields
- Best of all, it's free!
Note:- Quick Wiki care for its users and this is why some of the download links will open official sites for the virus free downloads.
How To Boost Internet Speed
Hello Friends !!
Internet speed is too slow ?? Don't worry guys, We are here to solve your all Problems.
Let's solve it.
Step 1:- open "RUN" and type "gpedit.msc".

Step 2:- Now expand "Local Computer Policy".
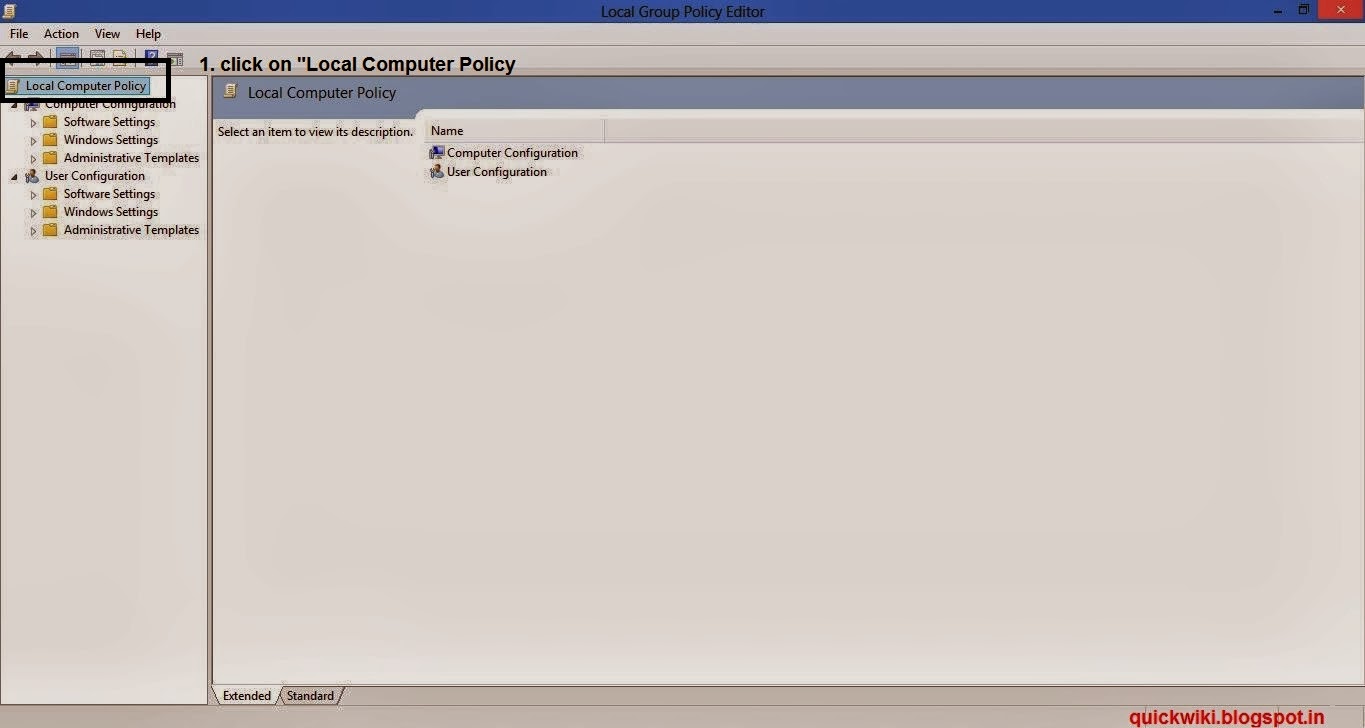
Step 3 :- Now expand "Administrative Templates" then click on "Network".

Step 4:- Now open "QoS Packet Scheduler".

Step 5:- Now open "Limit reservable bandwidth".
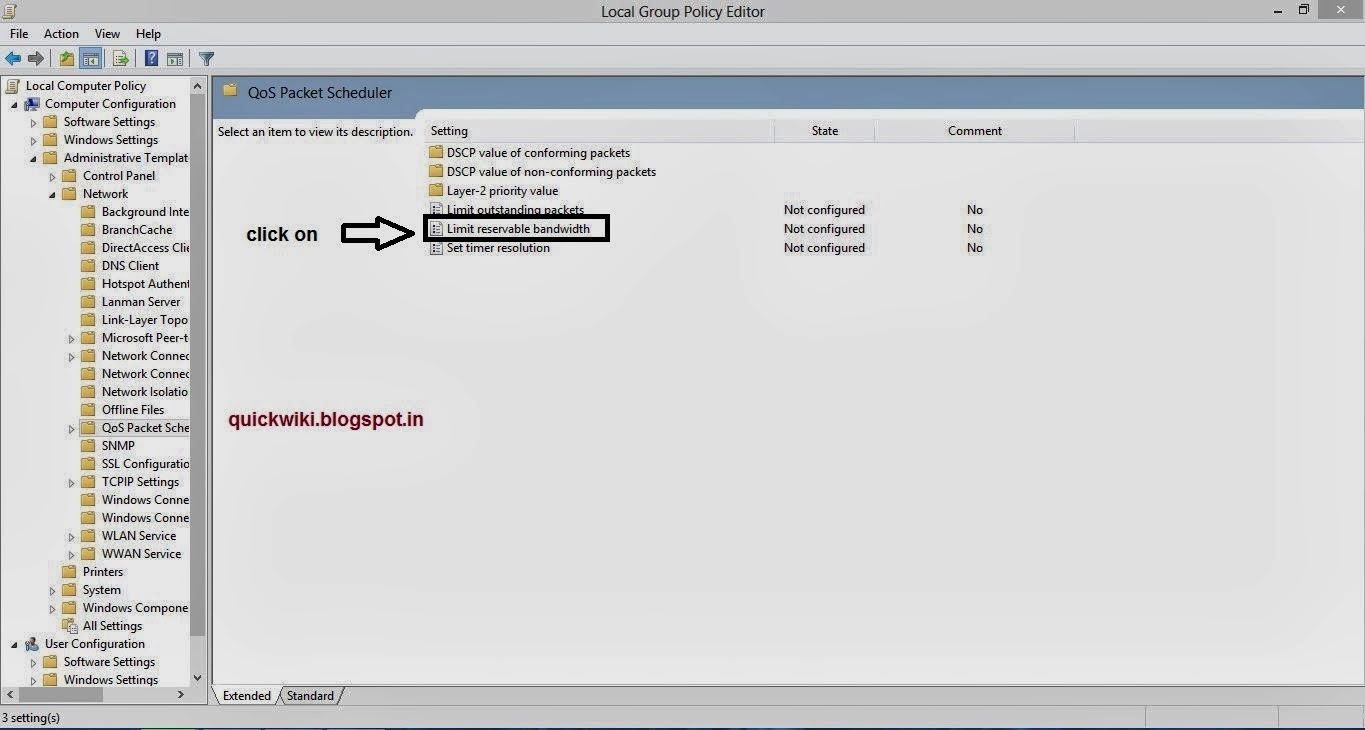
Step 6:- Now a new window will appear. Now "Tick Mark on Enable" then "Set bandwidth limit to 0% and apply these settings and close all windows".

Step 7:- Now Restart your PC.
Now you are done. Start browsing and feel the effect.
Internet speed is too slow ?? Don't worry guys, We are here to solve your all Problems.
Let's solve it.
Step 1:- open "RUN" and type "gpedit.msc".
Step 2:- Now expand "Local Computer Policy".
Step 3 :- Now expand "Administrative Templates" then click on "Network".
Step 4:- Now open "QoS Packet Scheduler".
Step 5:- Now open "Limit reservable bandwidth".
Step 6:- Now a new window will appear. Now "Tick Mark on Enable" then "Set bandwidth limit to 0% and apply these settings and close all windows".
Step 7:- Now Restart your PC.
Now you are done. Start browsing and feel the effect.
DON'T FOGET TO SAY THANKS... LIKE US ON FACEBOOK
How To Prevent Windows 10 From Automatically Download Updates
Windows 10 PCs automatically check for updates and install any updates they find. You can take some control over this and have Windows 10 install updates on your schedule, but these options are hidden. Windows Update really wants to automatically update on Windows 10.
Professional, Enterprise, and Education editions of Windows 10 have access to group policy and registry settings for this, but even Home editions of Windows 10 give you a way to stop updates from automatically downloading.
Prevent Automatic Downloading of Updates on a Specific Connection
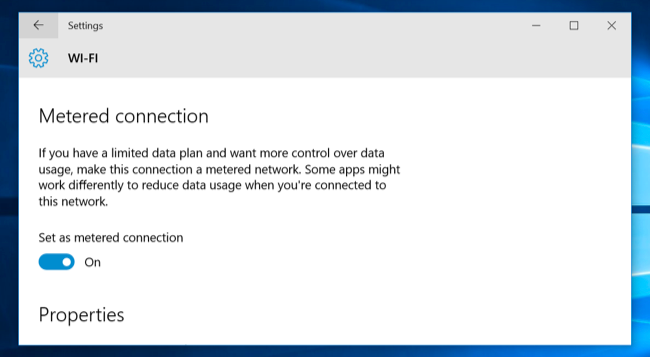
When you set a connection as “metered,” Windows 10 won’t automatically download updates on it. Windows 10 will automatically set certain types of connections — cellular data connections, for example — as metered. However, you can set any connection like as a metered connection.
So, if you don’t want Windows 10 automatically downloading updates on your home network connection, just set it as a metered connection. Windows 10 will automatically download updates when you connect your device to an unmetered network, or when you set the network it’s connected to as unmetered again. And yes, Windows will remember this setting for each individual network, so you can disconnect from that network and reconnect all you like.
Do you have an Internet connection with limited data? Just mark it as metered and Windows 10 won’t automatically download updates on it. If your connection offers unlimited downloads at a specific time — for example, during the middle of the night — you could mark the connection as unmetered occasionally at these times to download updates and mark it as metered after the updates are downloaded.
To change this option, open the Settings app, select Network & Internet, scroll down, and select “Advanced options” below the list of Wi-Fi networks. Enable the “Set as metered connection” option. This option only affects the Wi-Fi network you’re currently connected to, but Windows will remember this setting for each individual Wi-Fi network.
After enabling this option, Windows Update will say “Updates are available. We’ll download the updates as soon as you connect to Wi-Fi, or you can download the updates using your data connection (charges may apply.)” By marking a connection as metered, you’ve tricked Windows into thinking it’s a mobile data connection — for example, you might be tethering your PC to your smartphone. You can click the Download button to download and install updates at your leisure.

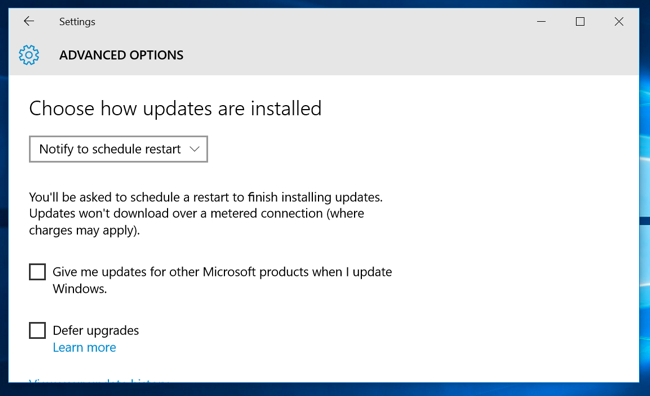
Stop Windows Update From Automatically Rebooting Your Computer
Windows 10 normally schedules reboots for when you aren’t using your computer. For example, it might try to schedule a reboot at 3 a.m. after installing updates. This is an improvement from previous versions of Windows, which wanted to reboot as soon as possible.
You can tell Windows Update to reboot on a schedule you choose instead. To change this setting, open the Settings app, select Update & security, select “Advanced options” at the bottom of the Windows Update pane, and select “Notify to schedule restart” instead of “Automatic (recommended).” Windows will ask you when you want to reboot after it installs updates.
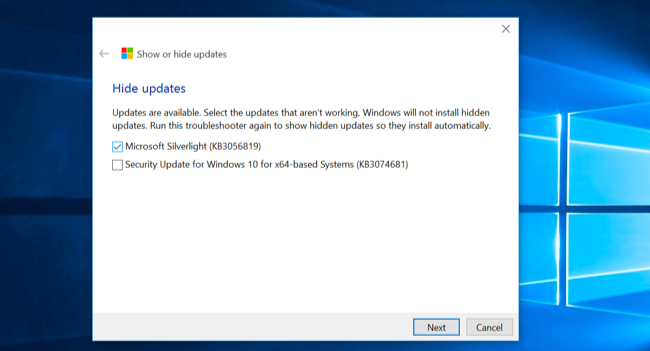
Prevent Windows Update From Installing Specific Updates and Drivers
If Windows 10 insists on installing a specific update or driver that’s causing problems, you can prevent Windows Update from installing that particular update. Microsoft doesn’t provide a built-in way to block updates and drivers from automatically being downloaded, but it does offer a downloadable tool that can block updates and drivers so Windows won’t download them. This gives you a way to opt out of specific updates — uninstall them and “hide” them from being installed until you unhide them.
Use Group Policy to Disable Automatic Updates — Professional Editions Only
Editor’s Note: You should really consider leaving automatic updates enabled for security reasons.
There’s actually an option that will let you choose how updates are installed on your own schedule, but it’s buried in Group Policy. Only Professional, Enterprise, and Education editions of Windows 10 have access to the Group Policy editor. To access the group policy editor, press Windows Key + R, type the following line into the Run dialog, and press Enter:
gpedit.msc
Navigate to Computer Configuration\Administrative Templates\Windows Components\Windows Update.
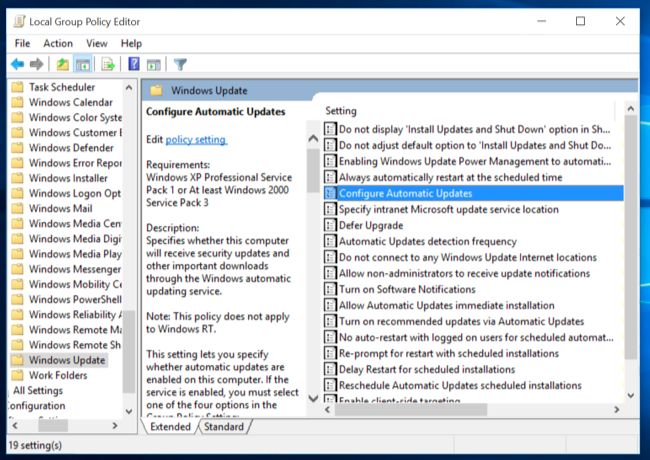
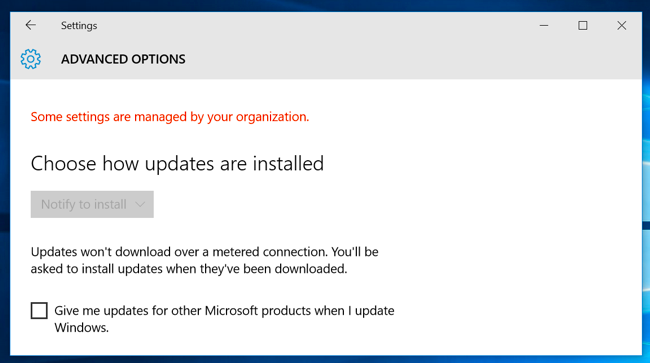
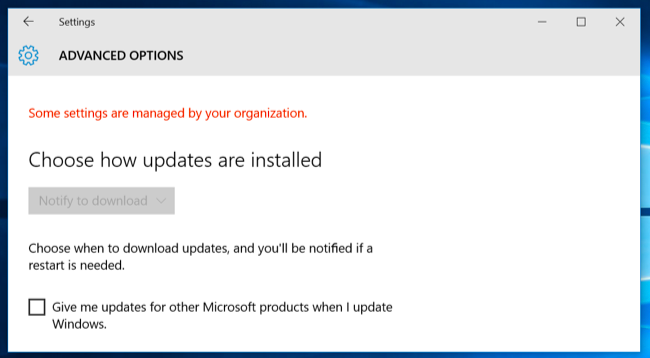
Locate the “Configure Automatic Updates” setting in the right pane and double-click it. Set it to “Enabled,” and then select your preferred setting. For example, you can choose “Auto download and notify for install” or “Notify for download and notify for install.” Save the change.
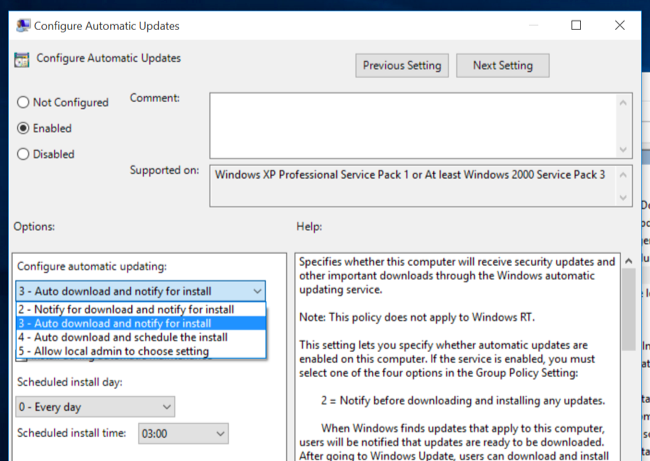
Visit the Windows Update pane, click “Check for updates,” and then select “Advanced options.” You should see your new setting enforced here. You’ll also see a note saying “Some settings are managed by your organization,” informing you that these options can only be changed in Group Policy.
To disable this later, go back to the Group Policy editor, double-click the “Configure Automatic Updates” setting, and then change it from “Enabled” to “Not configured.” Save your changes, visit the Windows Update pane again, click “Check for updates,” and then select “Advanced options.” You’ll see everything change back to the default setting. (Windows Update only seems to notice the setting change after you click “Check for updates.”)
Use the Registry to Disable Automatic Updates — Professional Editions Only
This setting can be configured in the registry, too. This registry hack does exactly the same thing as the above Group Policy setting. However, it also only seems to work on Professional editions of Windows 10.
Download our Disable Automatic Updates on Windows 10 registry hack and double-click one of the included .reg files to make Windows Update notify for download and notify for install, auto download and notify for install, or auto download and schedule the install. There’s also a .reg file that will delete the registry value the other files create, allowing you to go back to the default settings. This only worked when we tried it on Windows 10 Pro, not Home.
After changing this option, visit the Windows Update pane in the Settings app and click “Check for updates.” You can then click “Advanced options” and you’ll see your new setting here. (You have to perform a check for updates before Windows Update notices your changed setting.)
If you’d like to do this yourself, the exact setting you’ll need to change is under HKEY_LOCAL_MACHINE\SOFTWARE\Policies\Microsoft\Windows\WindowsUpdate\AU — you’ll need to create the last few keys there. Create a DWORD value named “AUOptions” under the AU key and give it one of the following values:
00000002 (Notify for download and notify for install)
00000003 (Auto download and notify for install)
00000004 (Auto download and schedule the install)
00000003 (Auto download and notify for install)
00000004 (Auto download and schedule the install)
There’s another “trick” making the rounds for this. It involves disabling the Windows Update system service in the Windows services administration tool. This isn’t a good idea at all, and will prevent your computer from receiving even crucial security updates. While it would be nice if Microsoft offered some more choice of when to install updates, you shouldn’t opt out of security updates entirely. To prevent Windows from automatically downloading updates on any PC, just set its connection as metered.
How to Fix the “Wi-Fi: No Hardware Installed” Error On Mac OS X

If you brought your Mac back from sleep only to see that your Wi-Fi isn’t working at all, even after a reboot, you might be experiencing the Wi-Fi: No hardware installed error. And luckily it’s really easy to fix.
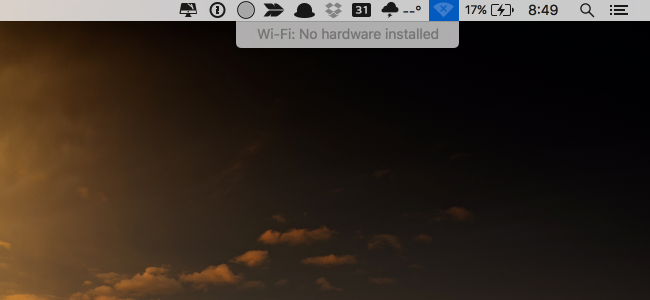
Essentially what has happened is that the MacBook lost track of which devices are supposed to be powered on and which are supposed to be powered off, and it just left your Wi-Fi completely turned off even though the rest of the computer is on. It’s like when you wake up and your arm is still asleep because you slept funny. The rest of you is ready to go, and your arm doesn’t want to work.
Luckily you can fix this very simply by resetting the System Management Controller (SMC), which is as easy to do as pressing a couple of keys.
What is the System Management Controller?
The SMC is a subsystem in Mac computers that helps control power management, battery charging, video switching, sleep and wake mode, LED indicators, keyboard backlighting, and a bunch of other stuff.
When your computer goes in and out of sleep mode, the SMC will control what devices are powered down to save battery. And this is where the problem lies. The SMC gets the wrong signal and thinks the Wi-Fi adapter should stay powered off even when the computer comes back to life.
Resetting the System Management Controller (to Fix Your Wi-Fi Problem)
If you’re using a device that doesn’t have a removable battery, which is pretty much all devices that Apple has made for a very long time, you’ll need to close down your apps and then use a simple key combination.
Newer MacBook without a Removable Battery
- Plug the laptop into a power source
- Press and hold all of these keys at the same time: Control + Shift + Option + Power
- Release the keys
- Press the Power button to turn it back on
Older MacBook with Removable Battery
If you’re using an older device that has a removable battery, you can use a slightly different method for resetting the system management controller.
- Unplug the laptop
- Remove the battery
- Press and hold the power button for 5 seconds
- Put the battery back in and turn everything back on
Mac Mini, Pro, or iMac
If you’re using an Apple desktop, the process is very simple.
- Turn it off and unplug from the wall
- Wait 15 seconds (or a few more to be sure)
- Plug it back in and turn it on
At this point your problems should be solved, and hopefully you can get back to whatever you were doing.
How to Reinstall OS X, Wipe Your Drive And Create USB Installation Media On Mac

Macs can automatically download and reinstall their operating system. This process normally keeps your personal files, but you can choose to erase them. You can also create USB installation media to speed up installing OS X on multiple Macs.
This is normally a simple process — just boot to OS X Recovery and select Reinstall OS X. Be sure to erase your personal files if you’re selling or getting rid of your Mac, though!
Reinstall From OS X Recovery
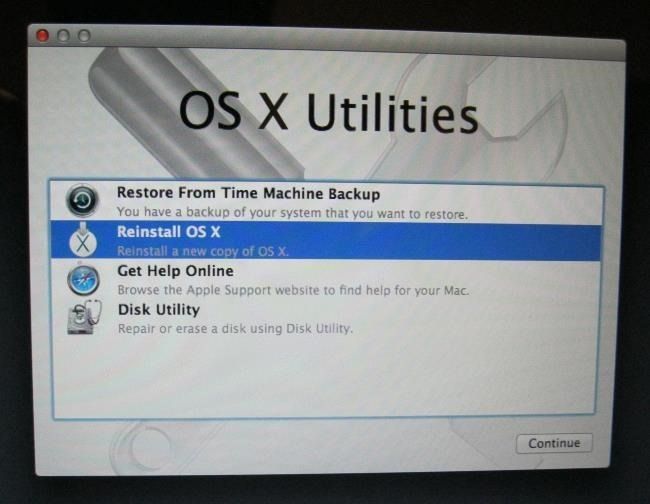
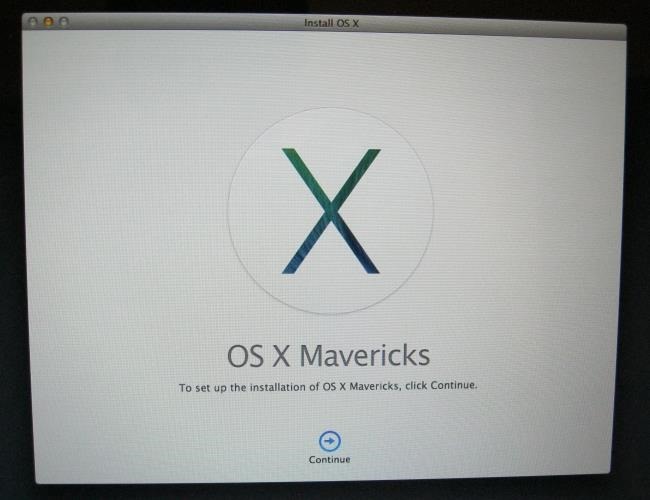
Note: Your files and user settings will be preserved when you reinstall OS X in this way.First, you’ll need to restart your Mac. Click the Apple menu at the top of your screen and select Restart. After your Mac restarts and when you see a gray screen, press and hold down the Command (⌘) and R keys at the same time. You’ll enter OS X Recovery and the first thing you’ll see is a “choose your language” screen.
Select the Reinstall OS X option after choosing a language and you’ll be walked through the process of reinstalling OS X on your Mac.
When you’re asked which drive you want to install OS X on, select your current disk — it will probably be the only disk available here. The wizard will walk you through the process.
Erase Your Personal Files and Settings
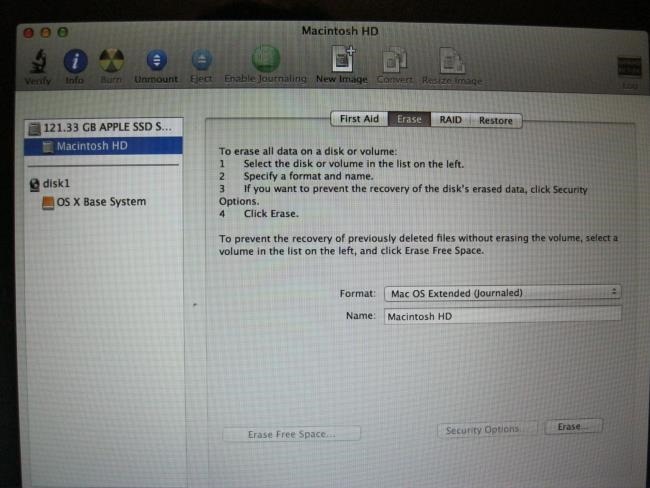
If it’s time to sell your Mac or just pass it on to someone new, you may not want to keep your personal files. You may want to erase them and perform a complete “factory reset,” resetting the Mac to a like-new state without any of your personal data. You can do this from the OS X Recovery screen.Before reinstalling Mac OS X on this screen, open the Disk Utility and select your Mac OS X startup disk. Click the Erase tab and use the options here to erase the entire disk. All your files — including the Mac OS X operating system itself — will be wiped away.
If you have a modern Mac, it probably uses a solid-state drive so your data won’t be recoverable. if you have a Mac with a mechanical hard drive, be sure to click the Security Options button. This allows you to perform a secure wipe, overwriting the drive with junk data so your files can’t be “undeleted.”
You can now reinstall Mac OS X from the Recovery Mode screen like you would above. You’ll end up with a like-new system without your personal files.
Create and Install From USB Installation Media
You may want to create USB install media instead of downloading Mac OS X on the fly. This is especially useful if you plan to reinstall or upgrade Mac OS X on multiple computers.We’re covering Mavericks here because it’s the latest version. It’s available free to all Mac users on the Mac App Store, so everyone can create installation media with this trick. Future versions of Mac OS X should work similarly.
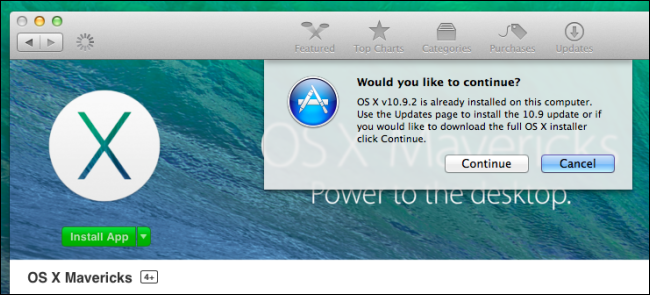
First, you’ll need to download the OS X Mavericks installer from the Mac App Store. Open the Mac App Store app, search for OS X Mavericks, and click Install App. Confirm the download — we need the installer itself to create recovery media.
Insert your USB drive. You’ll need a USB drive 8 GB or larger in size. You can also use an SD card or another type of external drive.
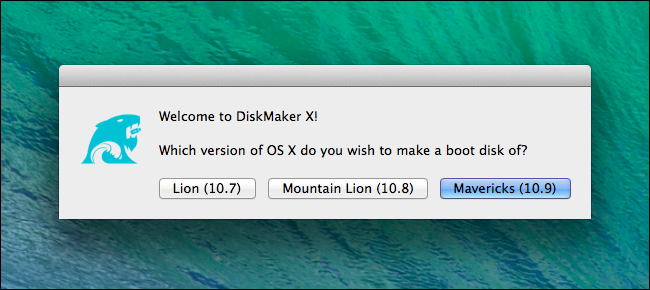
Close the installer when it appears — it doesn’t have a built-in, graphical way to create USB installation media. To do this with a graphical interface, install the free, third-party Disk Maker X application and launch it. It will walk you through the process.
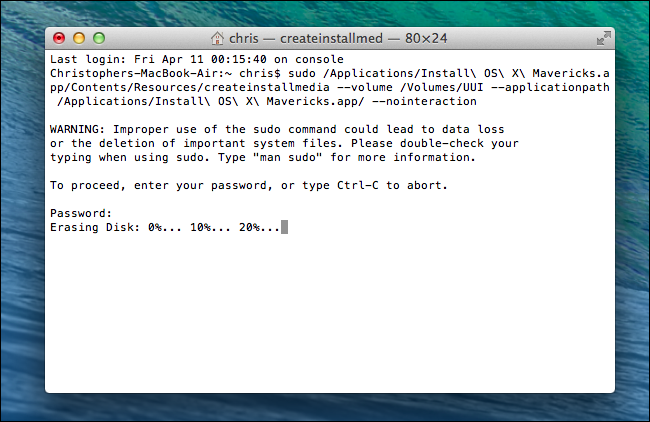
To do this with Apple’s official tools, you’ll need to use the terminal. To open the Terminal app, press Command + Space, type Terminal, and press Enter.
Run the following command, replacing Name with the name of the USB drive you’ve inserted. For example, if you see that the USB drive is named “Drive” on the Mac desktop, you’d replace Name with Drive.
sudo /Applications/Install\ OS\ X\ Mavericks.app/Contents/Resources/createinstallmedia –volume /Volumes/Name –applicationpath /Applications/Install\ OS\ X\ Mavericks.app –nointeraction
To speed things up, press Tab to use tab completion while typing this command or copy-paste it directly into the terminal.
Feel free to delete the Install OS X Mavericks app from the Applications folder in Finder afterwards. This will free up nearly 8 GB of space.
If you have a Mac OS X installer USB drive or DVD, you can always insert it into your Mac and boot from it to reinstall Mac OS X. To boot from an external device on a Mac, restart the Mac and hold down the Option key at the start of the boot process. You’ll be able to choose between connected boot devices.
How To Speed Up Your Mac

Macs can perform slowly, too. If your Mac seems to be running slower than it should, the variety of tips here should help you identify and fix the problem. As with a Windows PC, there are many reasons a Mac might be slow.
Stay away from programs that promise to “optimize” your Mac and make it run faster. Some “cleaning” programs — like the Mac version of CCleaner — can remove temporary files and free up space, but they won’t make your Mac perform faster.
Clean Up Your Mac Easily with CleanMyMac 3
The first step to a faster Mac is a cleaner Mac.
You can’t solve all of your speed problems just by running some magic utility, but cleaning up your hard drive is a good place to start — and there’s no better tool for the job than CleanMyMac 3 to get rid of all the junk on your small Mac hard drive.
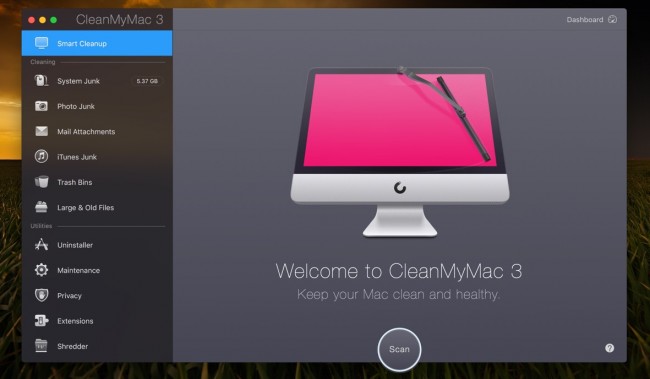
But it doesn’t stop there — CleanMyMac 3 can also be used to clean up your startup items list, remove system plugins, clean up after uninstalled applications, and more. It’s the utility that should have been built into OS X in the first place.
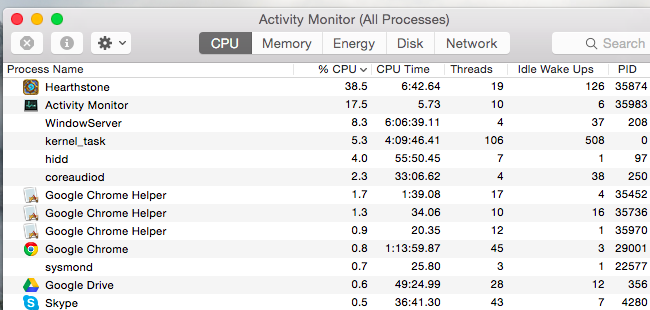
Find Resource-Hungry Processes
Use the Activity Monitor — sort of like the Task Manager on Windows — to view your running processes and find ones devouring too many resources. To launch it, press Command+Space to open Spotlight search, type Activity Monitor, and press Enter.
Click the “% CPU” heading to sort by CPU usage and see the running applications and processes using the most CPU. In some cases, there may be a single runaway application using 99% CPU that you’ll want to end. To force-quit a process, select it by clicking it and click the X button on the toolbar. Be sure you aren’t quitting a process that’s doing something important. You can always try to close a resource-hungry app in the normal way first.
If this isn’t working, click the “View” menu and select “All Processes” to see all the processes running on your Mac. You can also click over to the Memory section — a process using a large amount of memory could cause your Mac to slow down. Try the “Disk” section, too — a process using the disk heavily could also be causing your Mac to slow down.
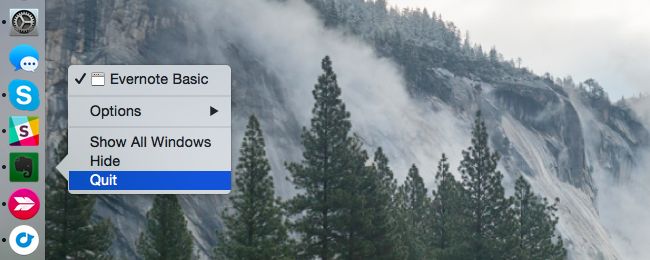
Close Applications
Mac OS X likes to leave applications running in the dock. Even clicking the red “X” button on an application window won’t close it — it’ll remain running in the background. In most cases, this isn’t a big problem. However, if your Mac appears to be running slowly, you may wnt to close some of these applications.
Look for the applications marked with a dot on your dock, right-click or Ctrl-click their icons, and select “Quit.”
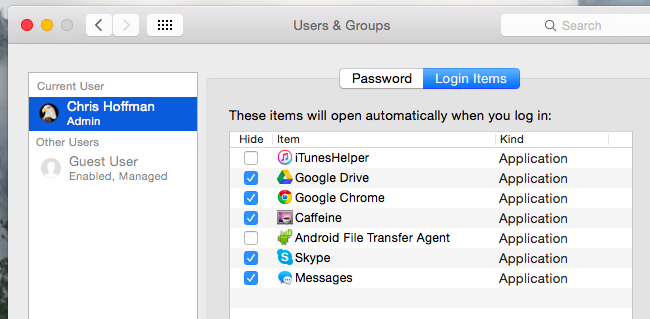
Prune Startup Programs
If your Mac is slow after you log in, it may have too many startup programs.
To manage startup programs, open the System Preferences window by clicking the Apple menu icon and selecting “System Preferences.” Click the “Users & groups” icon, select your current user account, and click “Login Items.” Uncheck any applications you don’t want starting when you log in.
If you ever want to make a program automatically start when you log into your Mac, drag-and-drop it into this list or click the “+” button at the bottom of the list and add it.
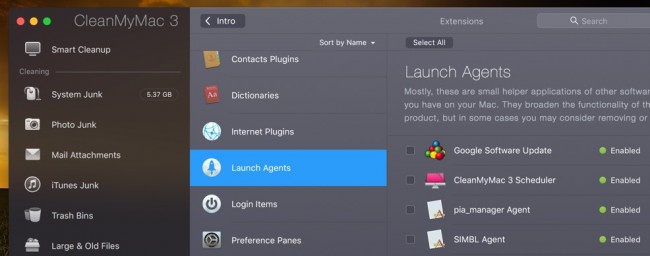
Clean Up Launch Agents
One of the hidden features in CleanMyMac 3 is that it can clean up Launch Agents, which are tiny helper applications that run secretly in the background and start other software automatically without you knowing. If you constantly have tons of stuff running that you don’t remember starting, you might have a Launch Agent problem.
Just download and run CleanMyMac 3, and then head into Extensions -> Launch agents to clean up the junk.
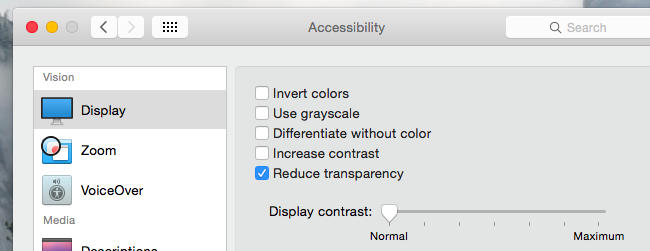
Reduce Transparency and Animations
Transparency and animations can tax the graphics hardware on older Macs. Reducing them can help speed things up — it’s worth a shot.
To do this, open the System Preferences window. Click the “Accessibility” icon and check the “Reduce transparency” option to reduce transparencies. On OS X Yosemite, this option can significantly speed up some older Macs.
You might also want to click the “Dock” preferences icon and select “Scale effect” rather than “Genie effect,” which could speed up the window-minimizing animation a bit.
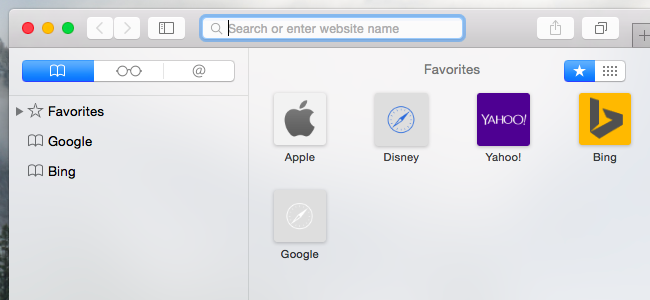
Lighten Your Web Browser
Your web browser might just be the application causing your problem. The usual tips apply on a Mac, too — especially considering Google Chrome’s performance is particularly bad on Mac OS X.
Try to minimize the number of browser extensions you use and have fewer tabs open at once to save memory and CPU resources.
You might also want to try the Safari browser included with Mac OS X, which does seem to perform better than Chrome — especially when it comes to battery power. If you can get away with using Safari and aren’t depending on a feature or extension in Chrome, for example, you might want to give it a serious try.
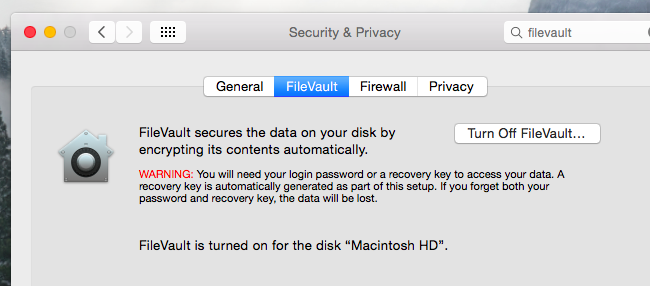
Disable FileVault Disk Encryption
FileVault disk encryption is enabled by default on Mac OS X Yosemite. This helps secure your Mac’s files if it’s ever stolen, preventing unauthorized access to them. It also prevents people from changing the password on your Mac and signing in without your permission.
On some Macs, this may cause the Mac to be very slow to boot or sign in. If this is the case, you can head to the System Preferences window, click the “Security & Privacy” icon, click the “FileVault” heading, and turn FileVault disk encryption off.
We recommend leaving FileVault enabled unless your Mac takes a very long time to boot or sign in.
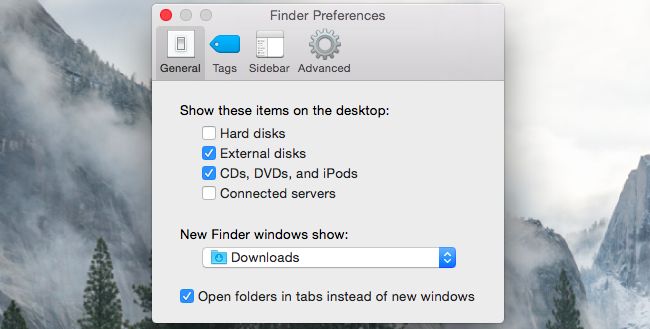
Speed Up the Finder
When you open the Finder window to view your files, it opens to an “All My Files” view by default. If you have a very large number of files on your Mac, this view might be slow to load, slowing FInder down every time you open a new Finder window.
You can prevent this from happening by clicking the “Finder” menu and selecting “Preferences” in Finder. Select your preferred folder under “New Finder Windows Show” — for example, you can have all Finder windows automatically open to your Downloads folder. Finder won’t load the All My Files view anymore.
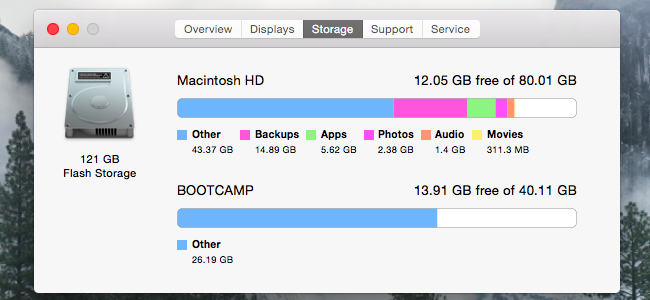
Free Up Disk Space
As on any computer, freeing up disk space can also speed things up if you have a very small amount of disk space. To check, click the Apple menu, select “About This Mac,” and look under the “Storage” heading.
If there isn’t a decent chunk of free space, you’ll want to free up space on your Mac’s internal storage.
Reset Your SMC to Fix All Sorts of Problems
This useful tip that can fix a wide variety of system problems on a Mac, although many people — especially experienced Windows users — wouldn’t think to try this. Resetting the System Management Controller — or SMC — can fix everything from slow performance to startup issues and Wi-Fi hardware problems. This won’t actually erase any data — it’s like performing a lower-level reboot of your Mac.
Follow the instructions in this article to reset your Mac’s SMC.
Reinstall Mac OS X
When all else fails, try reinstalling your operating system. This is a good tip every device — it’s even a good idea if you’re having a problem on an iPhone or iPad.
Assuming you have backups of your important stuff, you can reinstall Mac OS X on your Mac. This is much simpler than reinstalling Windows — you don’t have to download any installation media. You can just boot into a special recovery mode, start the installation, and your Mac will download everything it needs from Apple. But you will definitely want backups of your important files before you begin!
If you have a Mac with a mechanical hard drive, you might want to try upgrading it to a solid-state drive. That’s always a surefire way to speed up any computer.
How To Hide Zip Files Inside An Image In Windows

If you don't wanna use any software to hide your stuff then you can do so by following this trick to hide your files.
Since images are read from the header down, and zip files are read from the footer up, you can easily merge them as one single file , and no one will ever know. Read on to find out how.
Embedding Zip Files Inside Image Files
We tested this procedure using .png, .jpg, and .gif files and it worked with all three file types.
The first thing you will need to do is drill down into the directory that’s holding both your image file as well as your zip file, so press the Win + R keyboard combination, type cmd into the run box and hit enter. When the command prompt opens, use the cd command to change directories.
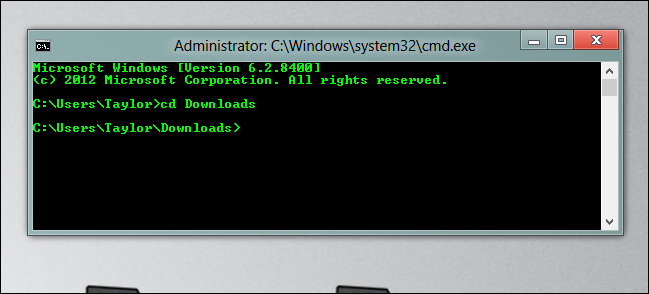
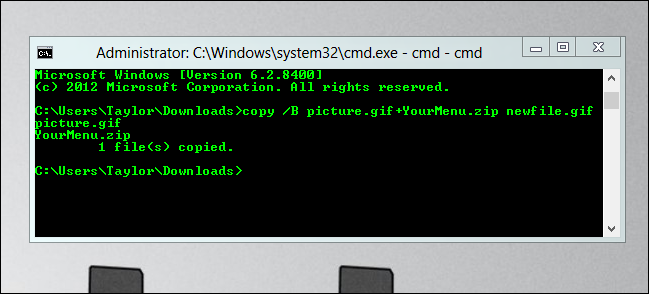
All it takes to merge the files is one simple copy command, the trick is to use the /B switch, which creates a binary file.
copy /B picture.gif+YourMenu.zip newfile.gif
This assumes:
- The original image is named picture.gif
- The zip file you want to hide in your image is called YourMenu.zip
- The combined image file will be called newfile.gif
- image
The result is a file that can be opened with an archiving program, such as 7-Zip or WinRAR, as well as with an image editor.

To access your hidden files again, open the 7-Zip File Manager, navigate to the newfile.gif file, and extract your hidden files from the image file.
Related Links:-
How to hide files inside an image in Linux
How To Hide File Or Folder Inside An Image In Linux
If other people use your Linux PC from time to time, you can hide files and folders from prying eyes. But if they know the obvious way to view hidden files, you can use a more secretive method: compress those files and hide them in an innocent looking image file.
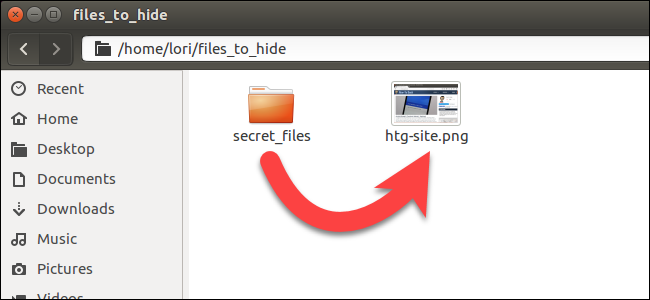
Before we begin, create a directory containing an image file (.png or .jpg), and the file or directory you want to hide. For our example, we are going to hide a directory of files, called secret_files. Our original image file is htg-site.png. Use the cd command to change to the directory containing the image and the file or folder to be hidden.
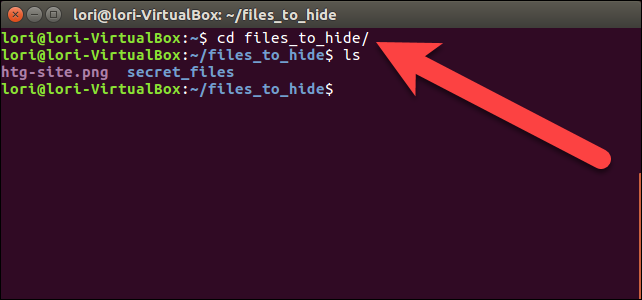
cd files_to_hide/
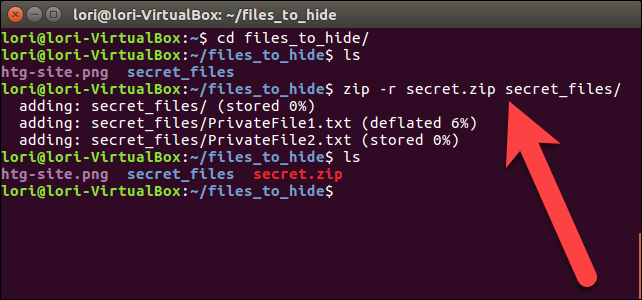
We will create a compressed file containing the directory we want to hide in the image. To do this, we type the following command at the prompt and press Enter.
zip -r secret.zip secret_files/
In the above command, -r will include all subdirectories within the specified directory in the compressed file. The name of the compressed file is secret.zip and the name of the directory to be compressed is secret_files.
When you are returned to the command prompt, type ls and press Enter. You will see the secret.zip file (or whatever you named your compressed file) listed.
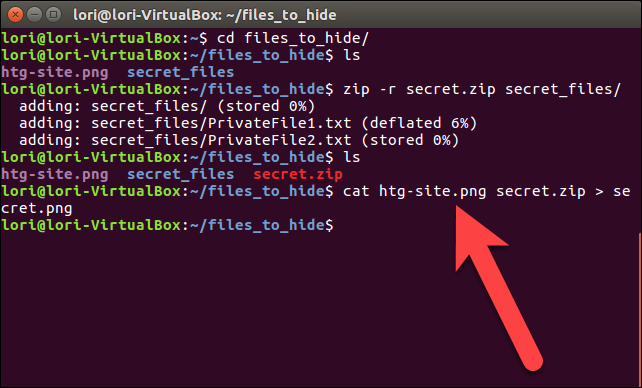
Now, we’re going to concatenate the compressed file and image file, and save that as a new image file using the cat command. In our example, we type the following command at the prompt and press Enter.
cat htg-site.png secret.zip > secret.png
The original image file must be listed first before the name of the compressed file you want to insert into the image file. Then, we direct (>) the original image file and the compressed file into a new image called secret.png .
When you use the ls command at the prompt, you’ll see the new image file, secret.png , that is hiding the compressed file. You can display the new image using any image viewer or editor. An easy way to view the image is to double-click on it in Nautilus. It will automatically open in the default image viewer.
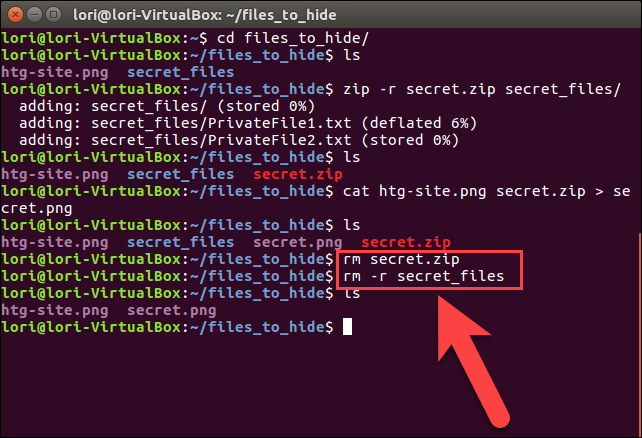
Once you have your new image that is hiding your file or folder, you can delete the compressed file and original file or folder, using the rm command. In our example, we typed the following two commands to delete our compressed file and original folder.
rm secret.zip
rm -r secret_files
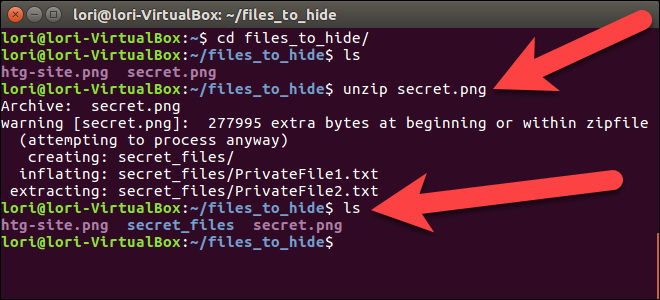
To access the hidden file or folder again, make sure you’re in the directory containing the image in which your file or folder is hidden. Then, extract the file or folder from the image by typing the following command and pressing Enter.
unzip secret.png
Substitute the name of your image file for secret.png in the above command.
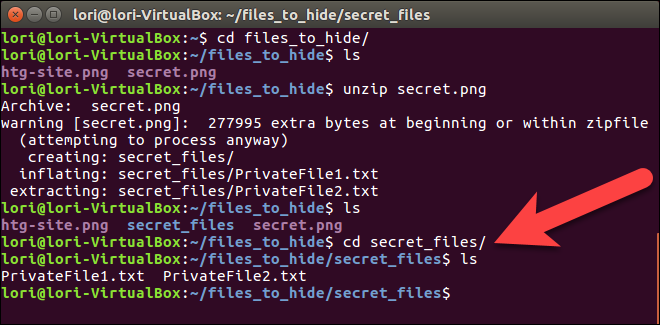
Our secret_files directory is available again, and when we change to that directory ( cd secret_files/ ), and list the files ( ls ), we see our original files.
This is not necessarily the most secure way to protect your files. It just makes them less obvious to someone poking around your system. You can encrypt your zip files to make them more secure.
Related Links:-
How to hide zip files inside an image in Windows
Subscribe to:
Posts (Atom)